Build your Customer 360 view Part 1 Using Dynamics 365 Customer Insights

      จะดีแค่ไหนที่คุณสามารถสร้าง Customer 360 Degree บน โดยการรวบรวม ข้อมูล กิจกรรมต่างที่ลูกค้าที่มีกับบริษัท ไม่ว่าจะเป็น การซื้อสินค้า บริการ Social posts , Web searches, หรือแบบสอบถาม สร้าง Model การวิเคราะเพื่อเข้าใจพฤติกรรมการบริโภคของลูกค้า ทุกมุมมองให้มากที่สุดจากข้อมูลหลายแหล่ง

รวมกันจาก Data ที่มีประสิทธิภาพนี้จะเพิ่มข้อได้เปรียบ ของธุรกิจในการตอบสนองความต้องการของกลุ่มค้าได้แบบเชิงรุก (Pro-active service)


หลายองกรณ์พยายามนำจุดแข็งของมาใช้งาน  ในโลกแฟ่งความจริง  บริษัทอาจจะมี Application ที่ใช้ประมวลผลข้อมูลของลูกค้า  การรวมรวมข้อมูลจากหลาย Source เป็นเรื่องท้าทายสำหรับผู้ใช้งานทั่วไป เช่น Marketing Team,Sales Team

แต่กว่าที่จะได้ Data ที่ใช้งานได้จริงนั้นต้องผ่านขั้นตอนมากมาย ตั้งแต่การร่วมรวมข้อมูล Getering Data ,Cleansing, Transform และการปรับใช้ Model ของ Machin Learning ที่เหมาะสม คงจะดีไม่น้อยถ้ามี

วันนี้จะผมจะขอพูดถึง Customer Insights ซึ่งเป็น Apps ที่อยู่ในตระกูล Microsoft Dynamics 365 

 ตัวช่วยรวบรวมข้อมูลจากหลายแหล่ง มารวมศูนย์กลาง และมี Model การวิเคราะเบื้องต้นที่รองรับธุรกิจหลายประเภท โดยมี User Interface ที่ใช้งานง่าย และมี Visualize Report ติดมาด้วย

Primary target audience ก่อนเพื่อให้ระบบ (Business Account B2B,Individual Customer B2C )

เนื่องจากมีบางตัวแปลที่ส่งผลต่อการ Analysis ข้อมูลเช่น  กลุ่ม B2C จะเป็นการวิเคราะผู้บริโภคโดยตรง กลุ่ม B2B วิเคราะลูกค้าซึ่งเป็นองกรณ์


สามารถทดลองใช้งานฟรีได้ที่  Dynamics 365 Customer Insights Trial


การใช้งาน Customer Insights มีขั้นตอนดังนี้

1. Add data

การดึงข้อมูลมา Customer Insights ซึ่งอาจจะมาจาก ข้อมูลบน CRM Application , POS Point of Sales,E-commerce website     มากมายรองรับอยู่แล้วใน 


ในบทความนี้ เพื่อให้เห็นภาพการนำเข้าข้อมูลที่ง่ายที่สุด ผมจึงขอเตรียมข้อมูลในรูปแบบของ Excel


จากนั้น  Upload ขึ้น Ondrive แล้ว Browse


User Interface การ Transform Data ที่เราคุ้นเคยเหมือนกับที่ใช้บน Power BI  

เช่นระบุว่า Column ไหนเป็น Date, Text , Currency เพื่อให้ระบบคำนวนได้ถูกต้อง


2.  Unify Data

หลังจาก เรา Upload Data source  ขั้นตอนถัดไป จะใช้ Concept  Match Map Mearge แเป็นการรวบรวมข้อมูลหลายๆ Source  สร้าง Relation กัน และสดท้าย Meage รวมแล้วแสดงผล  Customer Profile 

มีการช่วย Mapping Fielsd ด้วย AI


3. Data Enrichment


เพิ่มความแม่นยำของข้อมูล โดยการใช้นำ External Source ทั้งจากมาผนวกกับข้อมูลที่เรามีอยู่  Internal Source เช่น  


สามารถใช้ External sourcemทั้งจาก Microsoft และ Partner


- ความสนใจ interests, 
ความใกล้ชิดกับแบรนด์ brand affinities
ข้อมูลประชากร, demographic information,
 - สถานที่ที่เกี่ยวข้อง location-centric  เป็นต้น


4. Measure and Segmentation

เพื่อให้ได้รับมุมมอง 360 องศาอย่างแท้จริงเกี่ยวกับลูกค้า เราต้องวัด (KPI) จากข้อมูลทั้งหมดที่นำเข้า เพื่อมห้เห็นภาพรวมของลูกค้าที่ชัดเจนยิ่งขึ้น

โดย Measure นั้นมีหลาย Template ให้เราเลือกใช้ หากไม่ต้องการสร้าง Measure เอง

หลังจากได้ข้อมูลตั้งต้น Customer ที่สมบูรณแล้วจะเป้นการแบ่ง Segmentation เพื่อแบ่งกลุมของลูกค้าการแบ่งกลุ่มทำให้เราสามารถจัดกลุ่มลูกค้าของคุณตามคุณลักษณะด้านประชากรศาสตร์ ธุรกรรม หรือพฤติกรรม เพื่อกำหนดเป้าหมายแคมเปญส่งเสริมการขาย กิจกรรมการขาย ในกระบวนการถัดไป


5,  Intelegent Prediction

มาถึง Hight lisht คือการใช้ความสามารถของ  Machim Learning model ในการทำนาย พฤติกรรมของลูกค้า เพื่อประโยชน์ในการทำ กลยุธการขาย หรือ การบริการเชิงรุก 


ใน Customr Insights มี Machin Learning Model ให้ใช้ฟรี 4 ตัวและยังสามารถสร้างขึ้นเองโดยใช้ Custom Model ได้อีกด้วย


- Customer Churn Model

ข้อมูลลูกค้าที่อาจเปลี่ยนใจ หรือมีแนวโน้มที่จะหยุดซื้อสินค้าหรือบริการ  เพื่อให้เราสามารถปรับแลี่ยนสินค้าหรือ Promotion เพื่อดึงลูกค้ากลุ่มนี้ให้อยู่ต่อ

Product recommendations
ใช้ข้อมูลประวัติการซื้อสินค้า เพื่อแนะนำสินค้าที่ตรงตามความต้องการ และมีความน่าจะเป็นสูงที่ลูกค้าจะซื้อ


Customer lifetime value 
คาดการณ์จำนวนเงินที่ลูกค้ามีแนวโน้มที่จะใช้จ่ายกับธุรกิจของคุณในช่วงเวลาหนึ่ง

-Customer sentiment analysis
วัดความพึงพอใจของลูกค้าในด้านต่างๆ กับธุรกิจที่ผ่านมา


Customer Insights เหมาะกับใคร
                               
สำหรับองกรณ์ ที่ต้องการทำ Customer Data Platform โดยมีตัวช่วยในการรวบรวมข้อมูล  มี AI / Machein leanring สำหรับเร็จรูป  ที่ใช้งานง่ายมากๆ

ไม่ว่าจะเป็น Business Develoeprment , Marketer หรือ Sales เองก็สามารถใช้งานได้ ไม่จำเป็นต้องเชี่ยวชาญ ด้าน IT / Technical
เช่นการเตรียมข้อมูลจาก Excel แล้วทำการ Import หรือหากต้องการดึงจาก Database /API Service กับ Application อื่นๆก็สามารถทำได้ 


ใช้ Customer Data Platform เป็นศุนย์กลางข้อมูล โดยแบ่งปันข้อมูลให้กับ แพนกอื่นๆ ทำให้เห็นภาะรูปลูฏค้าแบบเดียวกัน และครบถ้วน ตั้งแต่การติดต่อ ประวัติการซื้อ การ Support Activity ที่ลูกค้ามีต่อบริษท
เมื่อเข้าใจลูกค้ามากขึ้น เราก็จะขายสินค้า และ บริการ ได้ตรงใจลูกค้ามากขึ้นนั่นเอง
สำหรับข้อมูลเพิ่มเติม Dynamics 365 Customer Insights 


ใน Part ถัดไปผมจะทดสอบการ นำข้อมูลCustomer Insights เชื่อมต่อกับ Application อื่นๆ เช่น

Microsoft Dynamics 365 applications
Microsoft Power Platform
Azure Synapse


Dynamics 365 F&O Account posting profile for the Sales Order processing

In Dynamics 365 F&O There is a sub-ledger transaction integrated behind sales order processing. The sub-ledger was created depending on two processes

 - Packing Slip Posted

 - Customer Invoice Posted

This article is my practice to analyze how system booking G/L for the Sales order processing

Ledger Account Related


Step 1: Setup Customer Posting profile

Customer posting group  Summary Account = 130100 Account Receivable Domestic


Setup for account receivable parameter.Enable Post packing slip in Ledger


Choose the Posing profile from the Prevoise customer posting profile


Make sure the example Customer is assigned the same group as the previous posting profile


Step2: Setup sales order inventory posting profile


You can either setup from Inventory management Posting or Item Group for specific group posing 

using Item Group


Make sure the example product is assigned to the same Item Group


Step3: Create Sales Order and analyst Voucher transaction 


Create and confirm Sales order 

Deliver quantity: 1 pcs
Unit price: 20,000 THB
Unit Cost: 1,000 THB
TAX: none


Post-Packing Slip

check on packing slip posted voucher transaction, Deferred COGS  and Physical Inventory was created


Post Customer Invoice

Check the Invoiced voucher transaction


Deferred COGS  and Physical Inventory were reversed from the  packing slip post (Delivered)
COGS  and Financial Inventory account was created instead

You can see related posing profiles on Purchasing side follow the link 
Thank you for visiting.

Credit 

https://learn.microsoft.com/en-us/dynamics365/finance/general-ledger/sales-order-posting
https://exploredynamics365.home.blog/2020/05/09/inventory-transactions-posting-profile-setup-part-1-in-dynamics-365-finance-and-operations/

Dynamics 365 F&O Account posting profile for the purchasing process

 In Dynamics 365 Financial and Operation Behind the purchasing operation. There is a sub-ledger transaction integrated. The sub-ledger was created depending on two processes

 - Product receipt posted

 - Vendor invoice posted

This article is my practice to analyze how system booking G/L for the purchasing process


Ledger Account Related


Step 1: Setup Vendor Posting profile

Vendor  posting group  Summary Account = 200100 Account Payable


Setup for account payable parameter.Enable Post product receipt in Ledger


Choose the Posing profile from the previous Vendor posting profile


Make sure the example Vendor is assigned the same group as the previous posting profile


Step2: Setup purchase order Inventory posting profile

You can define an Inventory posting account on Inventory Management >  Posting


Or Setup for Specific Item Group under Inventory Managment>Setup> Inventory >Item Group


Purchase Accrual for Vendor balance account for purchase receipt posting process


Make sure the Example productize assigned to the same Item Group

Make sure the Item Model group is enabled for Post Physical Inventory, Post Financial Inventory, and Accurate liability on product receipt


Step3: Create Purchase Order and analyst Voucher transaction (Stock Item)


Create and confirm purchase order 

Product quantity: 1 pcs
Unit price: 1,000 THB
TAX: none


Post product receipt

check product received voucher transaction, Accrual Purchas,e and Physical Inventory was created


Post Vendor Invoice
- Input Invoice Number
- Update match Status: Passed
- Post

Check the Invoiced voucher transaction


As you can see the Accrued Purchase and Physical Inventory were reversed from the product receipt 
Account payable and Financial Inventory account was created instead


The reason why purchase expenditure is zero is that this account is offset itself, you can track it on the Subledger journal


Step4: Create Purchase Order and analyst Voucher transaction (Non-Stock Item)


Item Model Group> Enable Accrue Liability on product receipt

Purchase order Inventory Posting profile


Released Product


Create and confirm purchase order 

Product quantity: 1 pcs
Unit price: 1,000 THB
TAX: none


Product receipt Voucher Transaction


Different from Stock Items, System book Purchase expenditure accounts rather than Physical inventory because the product is non-stock

Vendor Invoice Voucher Transaction


The Purchase expense 600140 was booked as a debit side for a non-stock item purchase


Already done posting profiles on the purchasing process. next episode I will try to explore posting profiles on Sales Order processing. Thank you for visiting.


Credit 
https://exploredynamics365.home.blog/2020/05/09/inventory-transactions-posting-profile-setup-part-1-in-dynamics-365-finance-and-operations/
https://www.linkedin.com/pulse/physical-vs-financial-inventory-transactions-ax-2012-chandu-naresh/
https://gopalthorve.com/procurement-inventory-accounting-microsoft-dynamics-365-for-finops/


Dynamics 365 F&O prepares VHD and deploy on Azure EP1.

Microsoft provides a Free Trial environment . or another environment as a Lab test from Microsoft learn. With Lab testing environment has limited time access about 8 hrs. and I found some feature has a limitation as well in both environment, for example, Creating new ledger entities and Development purpose. Therefore, I try to use another way by downloading Virtual hard disks VHD and hosting on Azure VM.

 A lot of content from the internet already describes how to provision VHD to Azure. I also try many steps before I found a working solution then I create this article for my note. and hope it may help someone who wants to do the same thing.


Step 1. Deploy Utility VM

Before downloading VHD Files. I suggest creating the first Utility VM in Azure for 3 objectives
- Download VHD fields and store inside the VM is much faster than local
- Convert VHD to VHD fix Size using Hyper-V service in VM
- Upload VHD Fixed Disk to Azure Blob container
Creating VM is optional if you have high-speed internet and Hight performance computer you can do it locally.


Create VM using Windows Server 2019


Step 2. Download VHD Fields from LCS
Connect the VM via RDP and then open the browser 


Dynamics 365 Finance and Operation allow the user to download VHD files that contain the F&O application installed from Microsoft Lift Cycle Service LCS.

After login to LCS discover under Shard Asset library >> Downloadable VHD
You have to download a compressed RAR file total of 9 parts and then extract it.


Step 3. Preparing VHD 


There is 2 sub-step to preparing VHD using the Hyper-V service
- Convert VHD to Fixed Size  
- Prepare generalized image

For more detail from Microsoft Learn 


Before doing  VHD preparation you need to Enable Hyper-V Service first
by adding a feature from the Server manager


You may need to restart before running the Hyper-V manager


Convert VHD to Fixed-Size


Connect to VM via Hyper-V and do generalized image


Step 4. Create Image Disk From VHD on Azure

Create Storage Account for Upload VHD 
Create Container and Upload VHD Fixed-Size. Select Blob Type: Page Blob


Create an Image from the uploaded VHD Fixed-Sized


Deploy VM from an Image


Step 5. Register Application from Azure AD
Converting Disk and Upload VHD  and Deployment VM may need much time to finish. If everything is correct. You will be able to create images and FO Virtual Machine. 


Create App Register: for more info on Microsoft Learn: Register a new application in Azure Active Directory


Copy Application ID


Now let's connect  VM Via RDP and do Generate Self-Signed Certificates, Enter the Application ID from Azure App Register.
Administration provisioning to add users under Azure AD
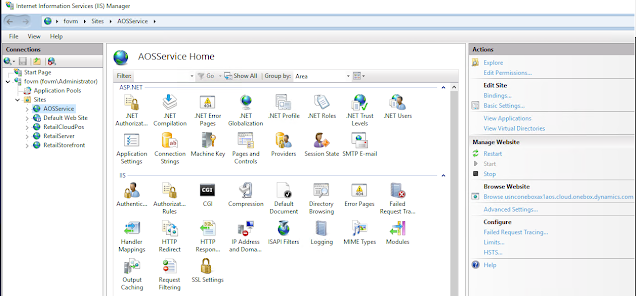
Open IIS Management and Browe website under AOSservice

Finally, the financials and Operation are ready on the web browser. Next episode. I will try to expose F&O to the custom public domain.